New Achieve User Interface
A new backend interface is coming to Achieve this summer. This guide shows how to document notes in both the current interface and the old interface.
Document Notes in the Current Interface
Notes can be documented both during and outside of appointment sessions.
Documenting Notes During an Appointment
- Under the Sign-in/Check-in tab, select Sign-in Queue.

- Once a student has been checked into the queue, select their name then click Start Session.

- Add notes to the Session Note field anytime during the session. At the end of the session, click Complete.

- Notes are recorded to the student's profile where they are visible to the staff who created them and those who have access to the program under which they were created.

Documenting Notes Outside of an Appointment
- Under the Student tab, search for and select the student who data you wish to view

- Select Notes.
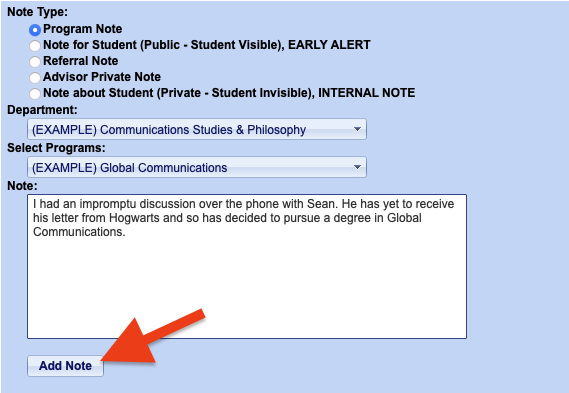
- Specify the note options:
- Note Types: Includes the following: Program Note; Note for Student (Public - Student Visible), Early Alert; Referral Note; Program Note; Advisor Private Note; Note about Student (Private - Student Invisible); and Internal Notes.
- To add a note tied to a program, select the Program Note option.
- Department: Specify the department the note should be associated with.
- Program: Specify the program the note should be associated with.

- Note Types: Includes the following: Program Note; Note for Student (Public - Student Visible), Early Alert; Referral Note; Program Note; Advisor Private Note; Note about Student (Private - Student Invisible); and Internal Notes.
- Add the note in the Note text box then select Add Note.
- Notes are recorded to the student's profile where they are visible to the staff who created them and those who have access to the program under which they were created.
Document Notes in the New Interface
Notes can be documented both during and outside of appointment sessions.
Documenting Notes During an Appointment
- Under the Check-in Queue tab, select Check-in Queue.

- Once a student has been checked into the queue, select their name/card then click Start Session.

- Add notes to the Session Note field anytime during the session. At the end of the session, click Complete.

- Notes are recorded to the student's profile where they are visible to the staff who created them and those who have access to the program under which they were created.

Documenting Notes Outside of an Appointment
- Select the Student tab then search for and select the appropriate student.

- Under Actions... select Notes.

- Specify the note options:
- Note Types: Includes the following: Program Note; Note for Student (Public - Student Visible), Early Alert; Referral Note; Program Note; Advisor Private Note; Note about Student (Private - Student Invisible); and Internal Notes.
- To add a note tied to a program, select the Program Note option.
- Department: Specify the department the note should be associated with.
- Program: Specify the program the note should be associated with.

- Note Types: Includes the following: Program Note; Note for Student (Public - Student Visible), Early Alert; Referral Note; Program Note; Advisor Private Note; Note about Student (Private - Student Invisible); and Internal Notes.
- Add the note to the text box then select Add Note.

- Notes are recorded to the student's profile where they are visible to the staff who created them and those who have access to the program under which they were created.