Submitting a Modification of an Existing Program
Use this guide to submit an Existing Program Modification in Coursedog and update the program record, requirements, and degree map.
Start a New Proposal
- Sign in to Coursedog Curriculum Management
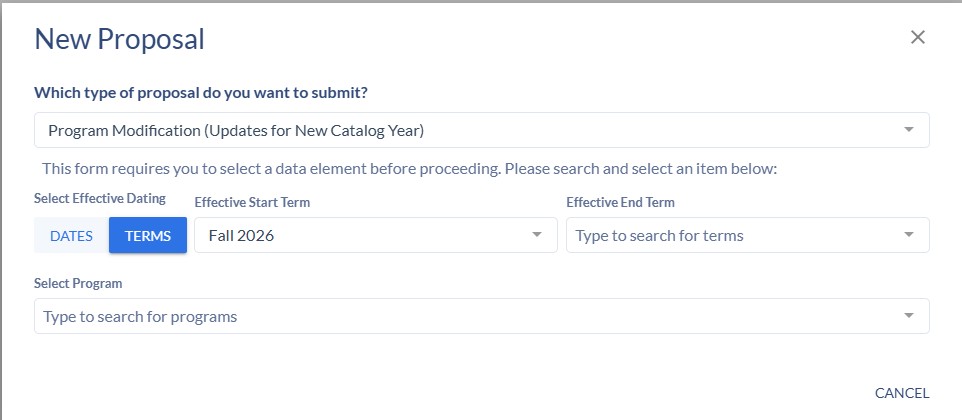
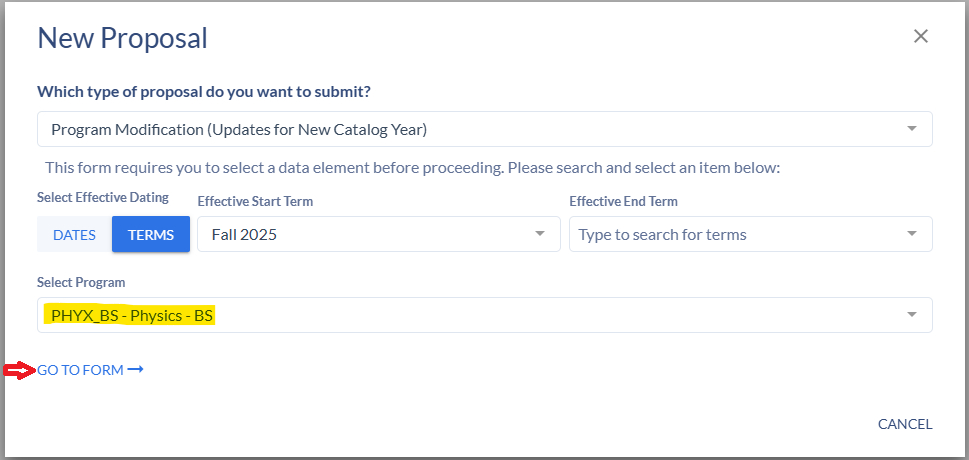
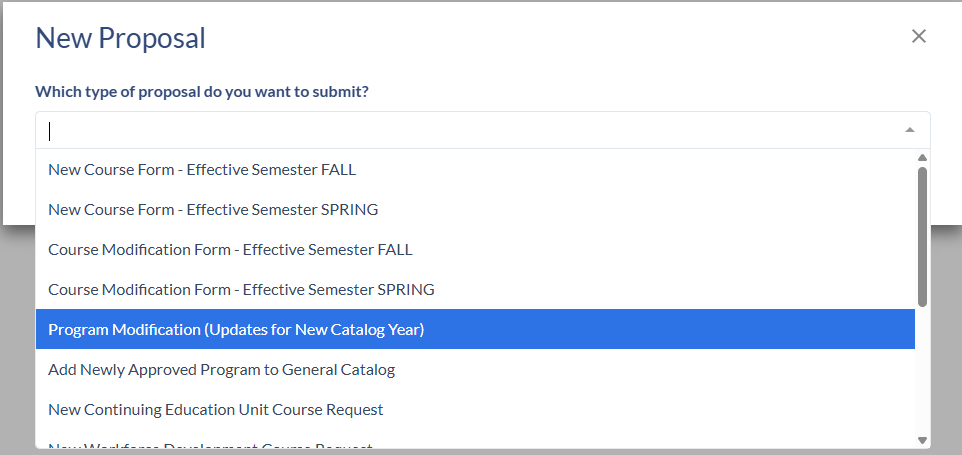
- Click New Proposal in the top-right corner and select the form Program Modification.
- Select the program to modify and choose the Fall term of the next catalog year (not the default current term). You may search by program code or program name. View example
- After selecting, you’ll be taken to a form that auto-populates with existing program details.
Editing the Program Form
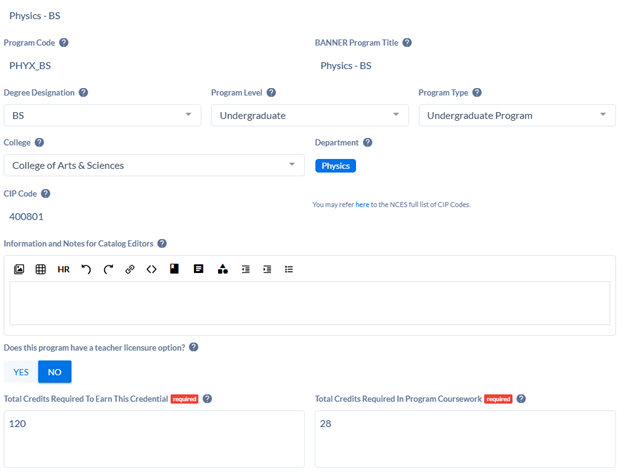
- Click into any section to make changes. The same catalog standards apply as for new programs.
- Confirm top information (degree designation, program level/type, college, department, licensure, and credit totals) is correct.
- Note: Program name changes require an approved R401 form.
- View example.
Key Sections to Complete
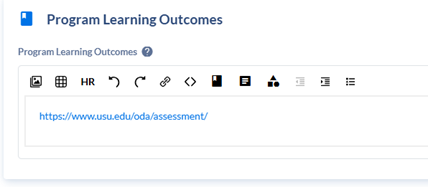
- Program Learning Outcomes: Link to the correct ODA site or enter the appropriate learning outcomes. View example.
- About This Degree: Brief intro/information only; do not include GPA, coursework, or admission details. See layout.
- Use the editing ribbon to format text, add tables, links, or embed catalog items.
- Admission Requirements: May include GPA for admission, advising info, and application links. View example.
- Minimum University Requirements: Maintained by the Catalog Team (do not change).
Modifying Program Requirements
Update program requirement text (minimum GPA in major coursework, minimum grade requirements, credits, internships, etc.) in the designated box. Do not list individual courses here.
Edit Courses
- Scroll to the Program Requirements section.
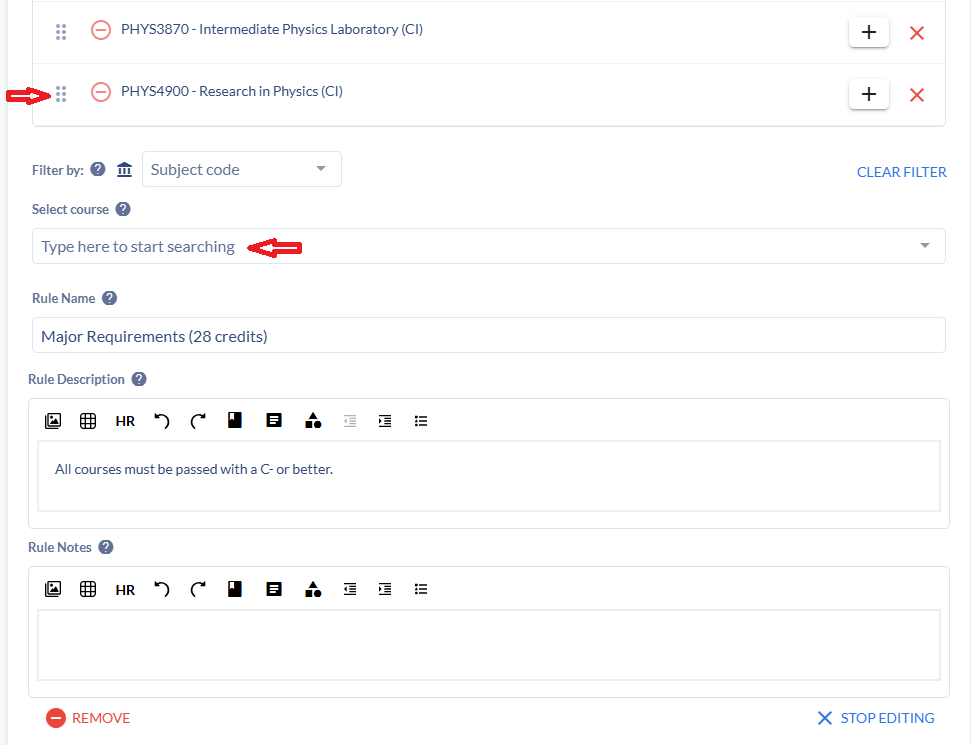
- Click the blue edit icon in the section/core you want to change.
- Remove courses by clicking the red “X”.
- Add courses using the Select Course field at the bottom.
- Rearrange courses using the 6-dot drag handle.
Add a New Section/Core
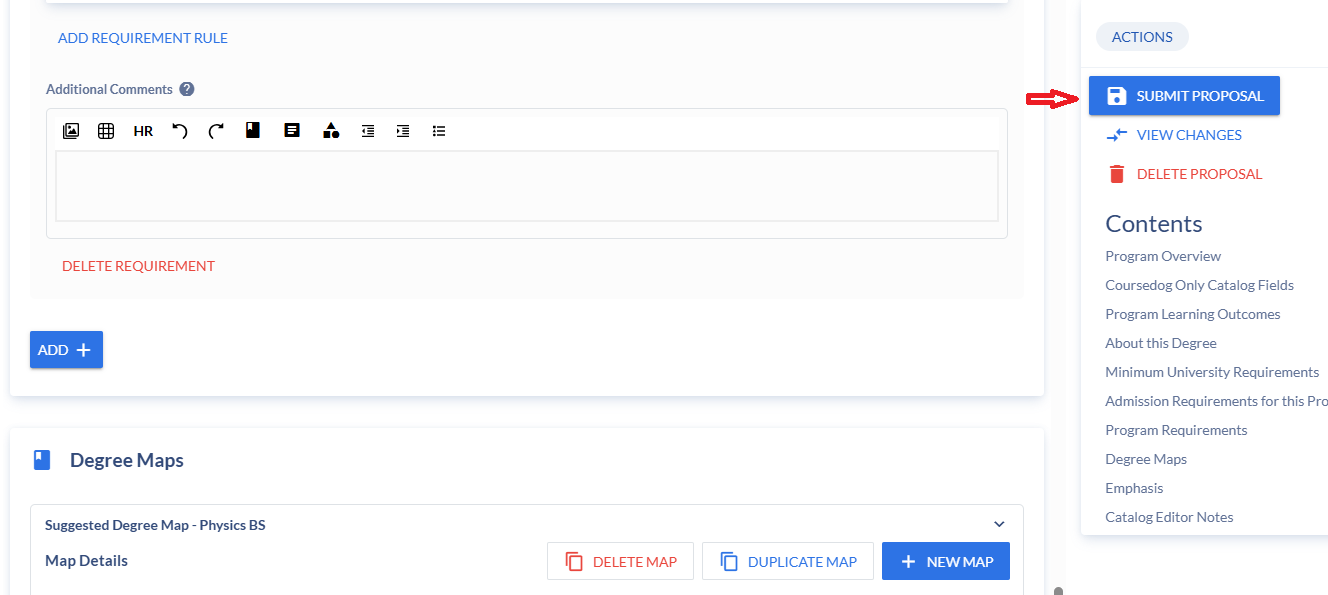
Click Add Requirement Rule, choose the rule condition, and complete the section details.
Modifying the Suggested Degree Map (if needed)
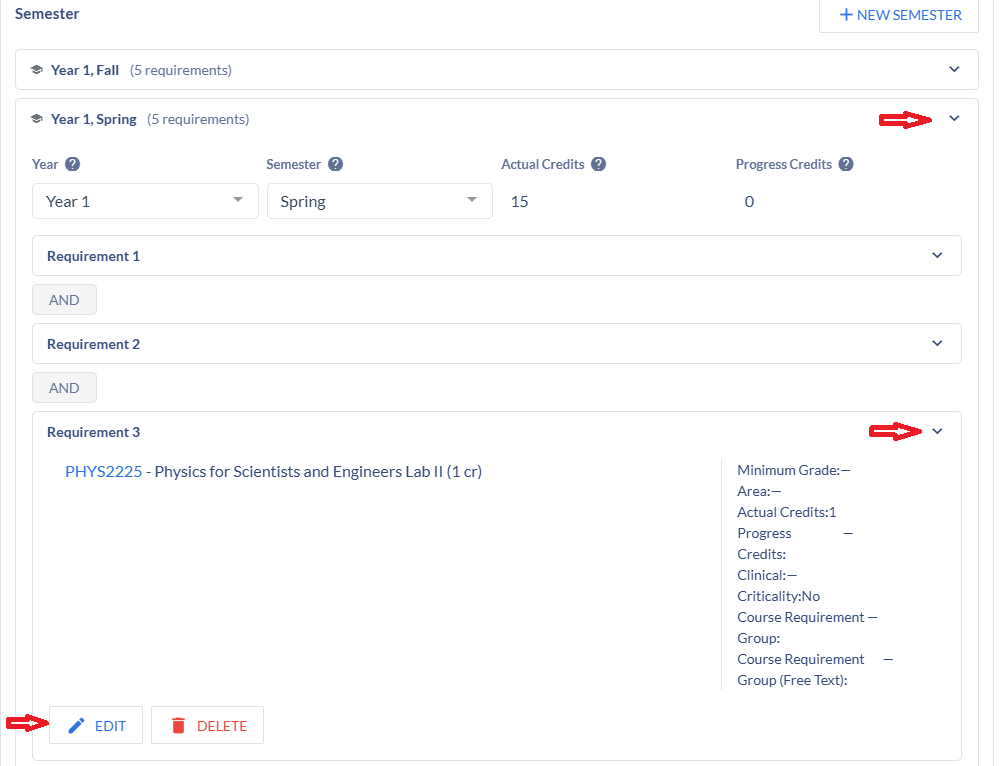
- Scroll to the Degree Map section.
- Click the caret (▸) next to a semester to view and edit courses.
- Click Edit to update requirements.
- Ignore the "Emphasis" card – it is not currently in use.
Submit Your Proposal
Once all updates are complete, click Submit.
Building and Editing Simple Requirements in Coursedog
Simple Requirements’ Quick Guide
‘Simple Requirements’ is the information in the ‘Program Requirements’ section of your program proposal. This content displays under the ‘Program Requirements’ tab in the catalog.
Important Notes
- This guide covers building and editing Simple Requirements only. See other program trainings for launching or editing full program proposals.
- If your program has multiple emphases, each emphasis has a separate catalog page and must be modified individually.
- Tips for specific formatting or editing existing requirements are shown in italic text below.
Best Practices for proper display
- No preview option is available in program proposals. Review formatting of similar programs in the catalog for reference before building your own.
- Proposals auto-save to your Drafts folder. You can leave and return anytime by accessing Drafts on the left-hand side.
- Avoid embedding courses and programs in text. Use the actual building process to ensure dependencies pull correctly from Simple Requirements.
- Only one proposal per program can be active at a time. Edit existing proposals for additional changes. The Catalog/Curriculum team can send proposals back if needed.
- Requirements are organized in separate blocks (‘rules’). Courses within a block can be reordered using the 6-dot drag handle, but blocks cannot be reordered. To change block order, delete and rebuild them in the desired sequence. Take a screenshot before deleting and rebuilding.
Building Simple Requirements from Scratch
Use these steps when building a new program or adding a new ‘Program Requirements’ section. (Skip this if editing existing program requirements.)
- Navigate to the Program Requirements block, about ¾ down the page.
- Select the blue ‘ADD +’ button in the bottom left-hand corner of the block. This will offer two options, ‘Requirement’, and ‘Narrative Text’.
- Always choose ‘Requirement’ (never use Narrative Text). This creates an Untitled Requirement where you’ll build your requirement blocks and cores.
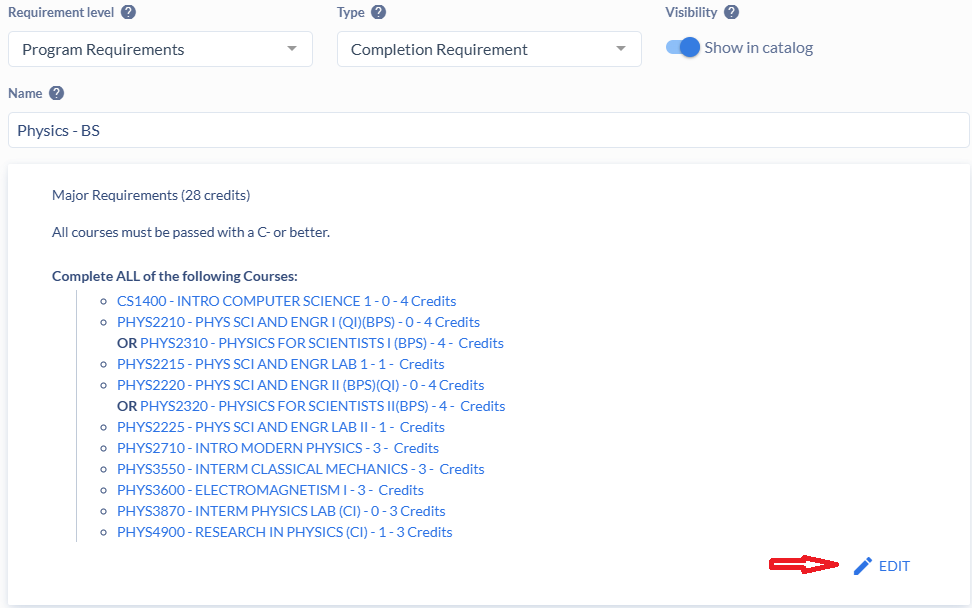
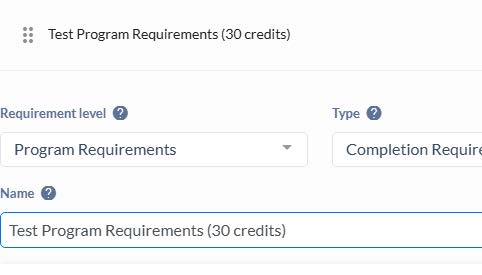
- Requirement Level: Select ‘Program Requirements’ from the dropdown.
- Type: Leave as ‘Completion Requirement’.
- Name: Enter the overall name of the program requirements and include total program credits (see example).
Note: The ‘Additional comments’ box is rarely used. Any text here appears at the very bottom of the entire requirement section.
You’ve now created the beginning structure for Program Requirements.
Adding Courses and Requirements
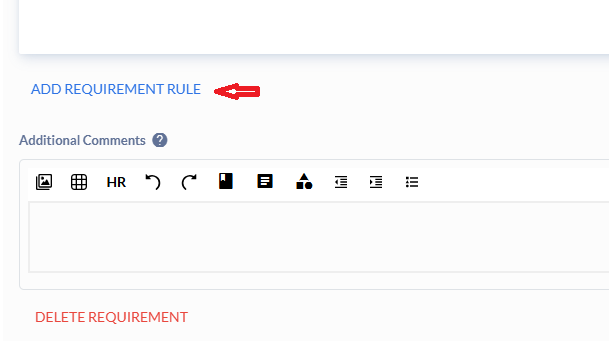
Next step: Select ‘Add Requirement Rule’ to add actual courses and requirements. This will populate your first requirement block.
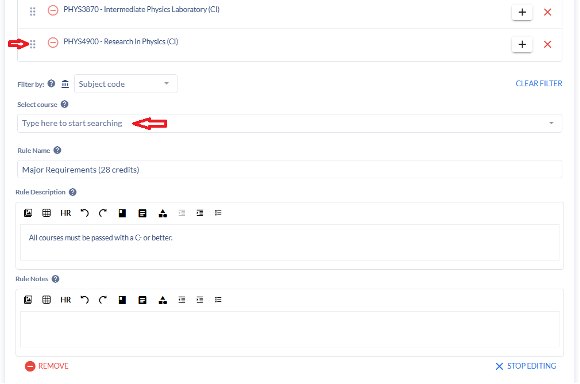
If you are editing an existing rule: Click the blue ‘Edit’ icon in the lower right corner of the block you would like to edit.
- Select your Rule Condition. This will populate the directions to the student for the following requirements.
- Basic Rule Conditions: Most Rule Conditions are for basic requirement lists. Select the condition that best fits your requirements.
- Once your condition has been selected, select the ‘Data Type’. (This will usually just be ‘Courses’.)
- Use the ‘Select Course’ field to add courses.
- Add your courses.
Tips for Course Listings
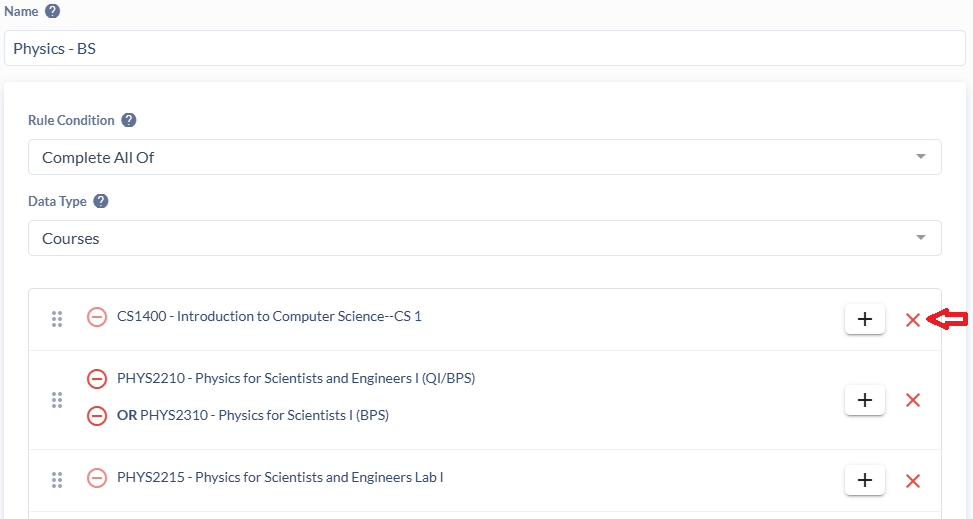
- ‘+’ sign beside courses adds and/or options between individual courses
- Red ‘X’ deletes the course from the listing
- Drag courses to reorder them within individual cores
- Name your block using the ‘Rule Name’ field—include the total credits required for that block
- See Example
Note to Editors
Adding Notes: There’s no option to add notes beside individual courses. Add any notes (variable credits, minimum grades, advising notes, etc.) in these fields:
- Rule Description – appears at the top of the block, before courses
- Rule Notes – appears at the bottom of the block, after courses
Managing Requirement Blocks
To add a new block: Select ‘Add Requirement Rule’ at the bottom of the block.
Add as many blocks as needed. Include credit totals in the Rule Name whenever possible.
Note to Editors
To remove a block: Select the red ‘Remove’ icon in the lower-left corner of the block.
To delete the entire ‘Program Requirements’ section, select the red ‘Delete Requirement’ option.
The blue ‘ADD +’ button adds an entire new ‘Program Requirements’ section, separate from the preceding information.
Note: ‘Program Requirements’ sections can be reordered, but the blocks within sections cannot.
Further Best Practices for Complex Requirements
The ‘Fulfill’ Rule Condition
Coursedog Curriculum cannot mix “and/or” options in a single course listing. For these scenarios, use a ‘Fulfill’ Rule Condition (see example below):
Start a new requirement rule and select either:
- ‘Fulfill ANY of…’ or
- ‘Fulfill ALL of…’ Rule Condition
- ‘Fulfill ANY…’ condition will place an ‘or’ between cores
- ‘Fulfill ALL…’ condition will place an ‘and’ between cores
Note to Editors
Switching an existing block to a ‘Fulfill...’ condition removes all existing information. Take a screenshot before switching and re-add data afterward if needed.
After selecting your ‘Fulfill’ option, the first block that appears is for general information and the overall block name.
Remember:
- Rule Description – appears above the entire section
- Rule Notes – appears at the bottom of the entire sections
- See Example
To add program information, click ‘+ Add Sub Rule’ at the bottom-right corner of the block.
This will populate the first requirement core. Each sub-rule will need a Rule Name (i.e. ‘Option 1’, ‘Option 2’, etc.)
Add as many sub-rules as needed. They will be separated with an ‘or’ or ‘and’ depending on which ‘Fulfill...’ Rule Condition you selected.
To create a new block independent of the ‘Fulfill…’ Rule Condition, select ‘Add Requirement Rule’ below the entire block.
Freeform Text Rule Condition
When requirements need to be written in paragraph form rather than listed, use the ‘Freeform Text’ Rule Condition to display typed text in Program Requirements.
The name of the block will go in the ‘Rule Name’ field.
As with the other blocks, the Rule Description and Rule Notes will appear above and below the text, respectively.
Text entered into the ‘Enter Text…’ field will show to the student as bolded, plain text.
Use this option only for text. Embedded courses, programs, or links won’t populate in dependencies and will require annual, dedicated, manual updates by the department.