Microphones
Many classrooms have a microphone that can be used for Kaltura recordings, Connect courses, and in some cases, in-room sound reinforcement (amplification).
Select a microphone or guide to learn more about it.


- Check out our Frequently Asked Questions on microphones.
- Contact us or schedule a training .
Guides
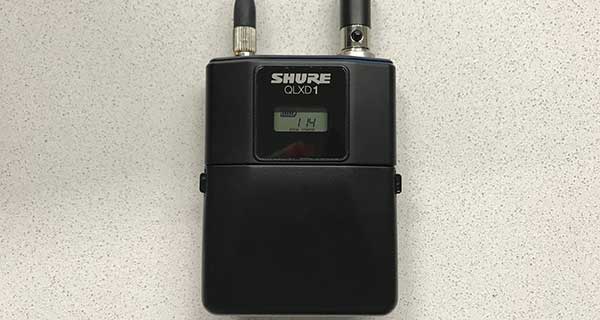
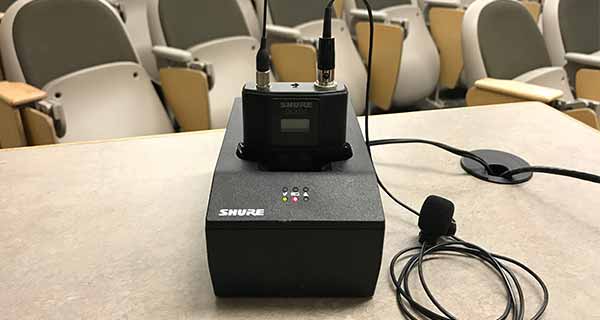
QLXD Microphones
QLXD microphones consist of a rechargeable battery pack and either a lapel or over-the-ear microphone. They can be found in a charging station on top of the instructor's desk or in a black drawer under the desk.
How to Operate
Turn on the microphone by toggling the power switch on the top of the battery pack to on
- A green light will appear next to the switch indicating the microphone is on.
- The battery pack is rechargeable and should not need replacement batteries. If the battery is dead, contact us
.

Clip the lapel microphone 6-8 inches directly below your mouth
Placing the microphone off to the side should be avoided to prevent audio from fading in and out as you move your head.
Place the battery back in a pocket or clip it to a belt or other article of clothing
Avoid placing it near a cellphone or other wireless device to prevent interference.
After Class
Turn off the microphone
Place the battery pack in the charging base
- The charging base is located on top of the instructor's desk or under the desk in an equipment rack.
- When fully inserted, the microphone will click into place and a red light will appear underneath the battery icon on the charging base.
- While it may look nice, the microphone cable should never be tightly wrapped around the battery pack or pinched. This can damage the microphone cable and cause shorts in the wire.
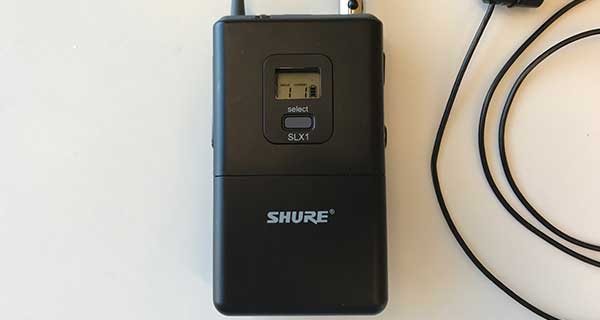
SLX Microphones
SLX microphones consist of a battery pack and lapel microphone. If needed, extra batteries should be near where the microphone is stored. They can typically be found in a black drawer under the instructor's desk.
How to Operate
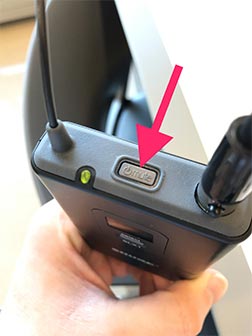
Turn on the microphone by pressing the power button on top of the battery pack
- The status light near the power button should turn green indicating the microphone is on. If it's flashing or solid red, replace the batteries.
- Extra batteries are often near where the microphone is stored. If you are unable to find extra batteries, contact us.
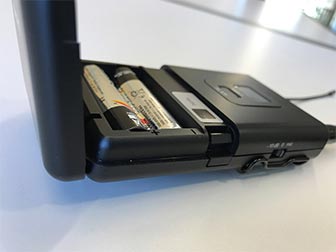
To replace the batteries, press in the tabs on either side of the battery pack and lift open the battery compartment door.
Clip the lapel microphone 6-8 inches directly below your mouth
Placing the microphone off to the side should be avoided to prevent audio from fading in and out as you move your head.
Place the battery back in a pocket or clip it to a belt or other article of clothing
Avoid placing it near a cellphone or other wireless device to prevent interference.
After Class
Turn off the microphone
Press and hold the power button on top of the microphone until the status light turns off.
Place the microphone in the drawer below the desk
- This helps the next class to more easily find the microphone.
- While it may look nice, the microphone cable should never be tightly wrapped around the battery pack or pinched. This can damage the microphone cable and cause shorts in the wire.
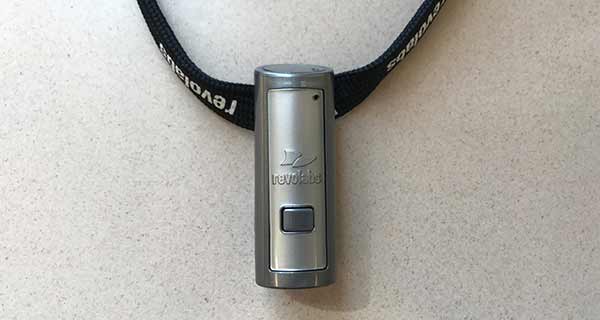
RevoLabs Microphones
RevoLab microphones are simple USB microphones that consist of a wireless microphone, shown below, and the charger base. They can be found in a charging station on top of the instructor's desk or in a black drawer under the desk.
How to Operate
Remove the microphone from its charger
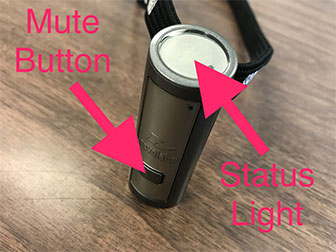
- The microphone should already be powered on but will most likely be muted. Unmute the microphone by pressing the mute button on the front of the microphone.
- A green light will flash on the top of the microphone indicating the microphone is on and unmuted. If a flashing red light is visible, the microphone is muted.
- The microphone is rechargeable and should not need replacement batteries.
Clip the microphone 6-12 inches directly below your mouth or hang around the neck using the included lanyard
- Placing the microphone off to the side should be avoided to prevent audio from fading in and out as you move your head.
- The top of the microphone should be pointed up toward the mouth.
After Class
Place the microphone in the charger base
- The charging base will be on top of the instructor's desk or below the instructor desk, possibly in a drawer.
- Ensure the microphone is full inserted. Press and hold the power button on top of the microphone until the status light turns off.

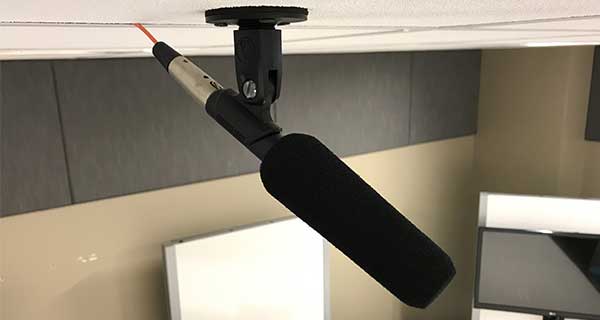
Ceiling Microphones
Ceiling microphones are found in most connect classrooms. They are used to record audio from the students/audience in a room and are typically controlled from the classroom touch panel.
How to Operate
Unmute and mute the ceiling microphone from the Classroom Touch Panel
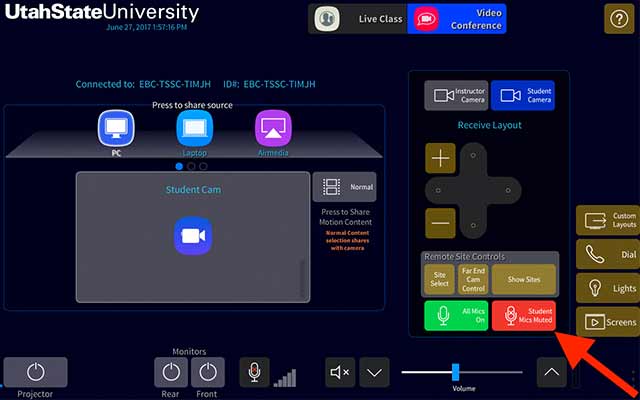
Not all classrooms will the same colored indicator to show whether the microphones are muted. Some rooms have a red/green indicator, others have a gray/black indicator, and others do not have a colored indicator at all. When the "Mute" button is red or gray, the microphones are muted. When the button is green or black, the microphones should be unmuted. In cases where the room doesn't have a colored indicator, try pressing "Unmute." If the microphones are still not picking you up, try pressing "Unmute" and try again.
The following screenshots show the location of the mute button on the different touch panels:


After Class
Mute the ceiling microphones before leaving the room
Set Up Sound Reinforcement
Sound reinforcement amplifies a person's voice in a large room or space. It is only available in larger classrooms and can usually be controlled from the classroom touch panel.
How to Operate
Turn on the microphone and put it in position
Lapel microphones should be placed 6-8 inches directly below the mouth.
Turn on and configure sound reinforcement using the Classroom Touch Panel
The following screenshots show where to enable sound reinforcement on the different touch panels:


Some rooms provide the ability to adjust the sound reinforcement level. Follow these steps to ensure the level is set properly to prevent feedback:
- Turn the sound reinforcement level down to about 25%.
- Start counting or speaking into the microphone.
- While speaking, slowly turn up the sound reinforcement volume until you just barely hear the sound reinforcement.
- The level is now set.
Frequently Asked Questions
Do all classrooms with a microphone have sound reinforcement?
No. Small to mid-size classrooms do not have in-room sound reinforcement (audio amplification). Most large classrooms will have sound reinforcement.
What do I do if the batteries are dead and I can't find extra batteries?
Contact us and we'll run some over immediately.