
Adobe Premiere Pro
Adobe Premiere Pro is a great tool for both editing your video and getting a transcript. It can even generate captions from the transcript if desired. To generate captions, follow the instructions below:
- Create a new project.
- Under Import, select your video from your computer and click the button “Create”.
- To open the Captions and Graphics workspace, select “Window” from the top navigation menu, then “Workspaces”, and “Captions and Graphics”.
- If you are in the “Transcript” tab select “Transcribe Sequence”. If you are in the tab “Captions”, select “Create Transcription”. A pop-up menu will appear asking how you would like the transcript. Most of the default settings can be left as they are. Select "Transcribe”.
- You can then choose to export the transcript as a text file. You can also choose to have captions generated from the transcript by selecting the “CC” icon and selecting “Create Captions” in the pop-up menu. The default settings in this pop-up menu should be fine to leave as they are. The captions can then be exported as an SRT file.
- When you are ready to upload the captions to your video, go to YouTube Studio and select the video you want to upload the captions to. Click the option “Subtitles” from the left-hand navigation.
- Select the language of the video, and then select the option “Upload File” > “With Timings”.
- Edit the captions as needed if you haven’t already.
- When you are finished select “Publish”. This will add the captions as a sidecar file that can be turned on or off on the video. It does not actually change the video itself.
Note: Keep in mind that while machine captions can help in the transcription and captioning process, they are often inaccurate and depend heavily on video quality. Be sure to go through your transcript or captions to edit any typos, misspelled words and names, or punctuation.
Burned in Captions in Adobe Premiere Pro
While we don’t typically recommend burning captions into videos on YouTube, there are situations where it may be necessary (social media, showing videos at events, etc.). Adobe Premiere Pro allows you to burn captions directly into the video.
- Open Premiere Pro and select New Project, then import your video.
- Switch to the Captions and Graphics workspace.
- If you have a caption file (e.g., from 3Play), select Import captions from file and choose your file. The default settings are typically fine.
- Review the captions in the timeline to ensure they are synced and displaying correctly.
- Once the caption file is imported, copy all of the caption text. You can either do CTRL+A or press shift and scroll to the last box.
- Open Window > Properties (or Essential Graphics in older versions) and enable a background box. Set it to black, and adjust the opacity to around 90%.
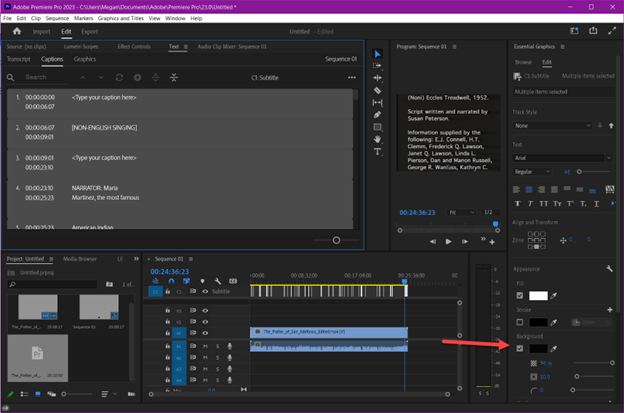
- Go to File > Export > Media.
- Under the Captions tab, select Burn Captions Into Video.
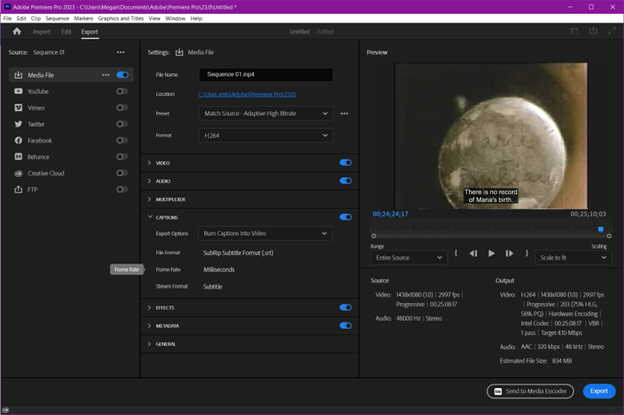
- Rename your file and export. It may take a while, depending on the length of the video.
- Watch your video and make sure everything looks correct.