
Canva Accessibility
Creating accessible content in Canva helps your designs be accessible to as many people as possible, including those with disabilities. This includes using clear, readable fonts, strong color contrast, meaningful text, and providing alternative (alt) text for images. Thoughtful layout, simple language, and consistent structure also help improve usability for everyone. By applying basic accessibility principles in Canva, you can create designs that are both visually engaging and accessible.
How to Create Accessible Content in Canva
When creating any kind of content on Canva, it is important to keep the following in mind:
- Use sufficient color contrast between text and background.
- Choose simple, readable fonts.
- Keep layouts clean and uncluttered.
- Avoid putting important text inside images.
- Add alternative (alt) text to all meaningful images.
- Ensure exported PDFs are reviewed for proper tags and reading order, as Canva may not automatically produce fully accessible PDFs.
Text and Readability
Having clear, readable text is an essential part of accessibility. Clear fonts, appropriate font sizes, and adequate color contrast help make any document accessible. The following best practices can help improve text readability in your Canva designs.
- Use clear, simple fonts (e.g., sans-serif).
- Avoid long blocks of text.
- Use sufficient color contrast between the text and the background. You can check contrast using tools like the WebAIM Contrast Checker or the TPGI Colour Contrast Analyser.
- Don’t rely on color alone to convey meaning. Pair them with text labels or icons when needed.
- Use large, left-aligned text for easy readability.
- Avoid justified text as it creates uneven spacing and can be hard to follow.
- Use Canva’s text spacing and alignment tools for clarity.

- To change the alignment of the text, click the alignment icon in the toolbar at the top. The text alignment will automatically change once you click on it.
- Left Aligned

- Right Aligned

- Center Aligned

- Justified

- Left Aligned
- Use Canva’s text spacing and alignment tools for clarity.
Headings
Headings and other structural elements help users understand and navigate content more easily. Screen reader and keyboard users rely on headings to navigate between sections quickly and efficiently. Using headings consistently helps create a clear and organized structure in your Canva designs. When adding headings in Canva, keep the following in mind:
- Use the built-in heading styles Canva provides (Heading 1, Heading 2, etc.) rather than manually changing the font size or making the text bold.
- Follow a logical heading hierarchy:
- Use a single Heading 1 for the main title. There should only be one Heading 1 for each document.
- Heading 2 for main sections.
- Heading 3 for subsections.
- Do not skip heading levels (e.g., don’t jump from Heading 1 straight to Heading 3).
- Keep headings short and descriptive so users can quickly understand the content of each section.
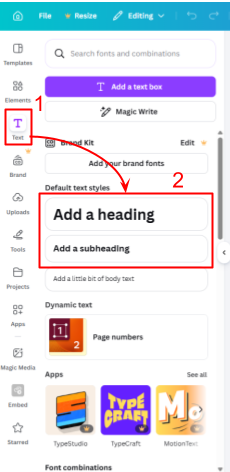
To add a heading/subheading in Canva:
- Select the Text tab in the far left column.
- Under the Default text styles section, select Add a heading or Add a subheading.
Descriptive Links
When adding links to any type of content, it’s important to use descriptive links. Instead of pasting long URLs, descriptive links clearly describe the destination of the link. This helps screen reader users and others quickly understand where a link will take them.
An example of this is:
- Non-Descriptive: https://www.canva.com/templates
- Non-Descriptive: Click here
- Descriptive: Canva Templates
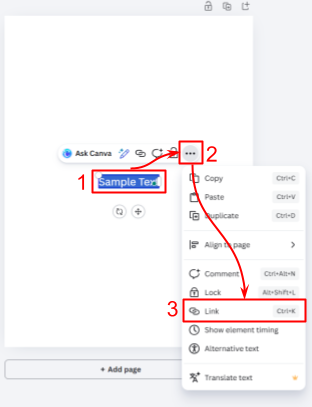
To add a descriptive link in Canva:
- Highlight the text you want to be a link.
- Select the More (three dots) option in the toolbar that appears.
- Select the Link option in the pop-up menu.
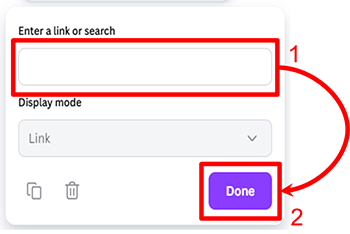
- Enter the URL in the Enter a link or search field.
- Click Done.
You can also use the keyboard shortcut Ctrl + K for Windows or Cmd + K for Mac and then follow steps four and five above.
For more information on creating accessible links, visit the Link Accessibility page.
Lists
Using Canva’s built-in list tools helps create structured, easy-to-read content. Lists improve readability and allow screen readers to identify and announce grouped information. This helps users understand how content is organized.
Canva can also automatically detect and format lists. For example, if you start a line with “1.” or “-” and press the space bar, Canva will convert it into a formatted list.
When creating lists in Canva, keep the following in mind:
- Use numbered lists for steps, sequences, or instructions.
- Use bulleted lists for grouped items that do not follow a specific order.
- Use checklists when tracking tasks or progress.
- Keep list items short and clear to support scanning and comprehension.
- Avoid nesting lists too deeply—one or two levels is usually best for readability.
To add a list in Canva:
- Place your cursor where you want to add a list.
- In the toolbar, select the bulleted list, numbered list, or checklist icon. The list type will automatically change when selected:
- Numbered:

- Bulleted:

- Numbered:
- Type your list items.
For more information on creating accessible lists, visit the List Accessibility page.
Alt Text
Adding alternative text (alt text) to images helps screen reader users understand the content and purpose of an image. Alt text ensures that important visual information is available to users who cannot see the image.
To add alt text to an image in Canva:
- Select the image.
- Click the More (three dots) option in the toolbar.
- Choose Alternative text from the menu.
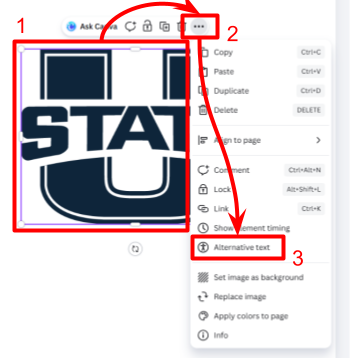
- Enter a description in the text box, or select Mark as decorative if the image does not add meaningful content.
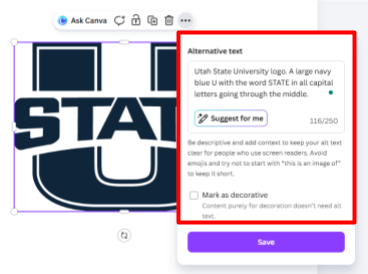
- Canva also provides a “Suggest for me” option that uses AI to generate alt text. This can be a helpful starting point, but always review and edit the suggested text to ensure it is accurate, clear, and appropriate for the context.
To learn more about alt text, visit our Image Accessibility page.
Tables
Tables should only be used to present data and information, not to format or change the layout of a page. When structured correctly, tables help screen reader users understand how information is organized and allow them to navigate between rows and columns efficiently. When creating tables in Canva, keep the following in mind:
- Use header rows to identify column or row headings.
- Keep tables simple.
- Avoid merged or split cells, as they can make navigation difficult.
- Provide clear, descriptive labels for all data.
To add a header row in Canva:
- Go to the Elements tab in the far left toolbar and select Tables.
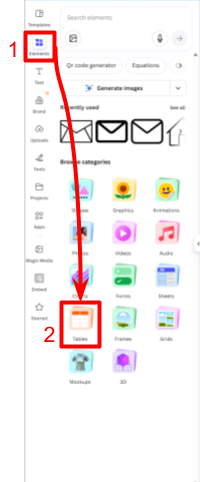
- Select a style from the tables provided.
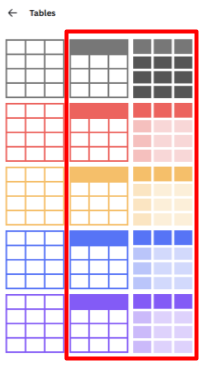
- You can change the table cell color and text color in the toolbar at the top of the screen.

Comments
When reviewing/editing your own or someone else’s work, use the comment feature in Canva instead of adding notes and edits directly to the document. This helps keep the document clean and makes it easier for screen reader users to navigate the document and review any feedback given.
There are two versions of the comment tool in Canva. The first is making comments on a document while in Editing mode (shown above the toolbar in the top left corner of the page):
- Right-click anywhere on the screen and select the Comment option in the pop-up menu.
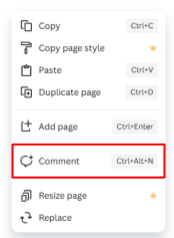
- You can also use the keyboard shortcut:
- Mac: Option + Cmd + N
- Windows: Ctrl + Alt + N
- You can also use the keyboard shortcut:
- Add your comment in the text box that appears in the top right corner of the page, then hit the purple arrow button to save the comment.
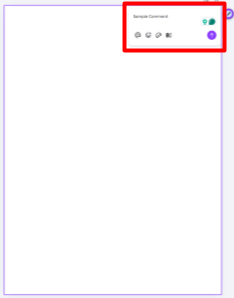
- This will then leave a comment on that page of the document.
The second way to make a comment in Canva is by switching to the Commenting mode of Canva. In the Commenting mode, you are only able to make comments on pages of the document. To switch to this mode and begin commenting:
- Select the drop-down menu labeled Editing in the top left corner of the page.
- Select the Commenting option.
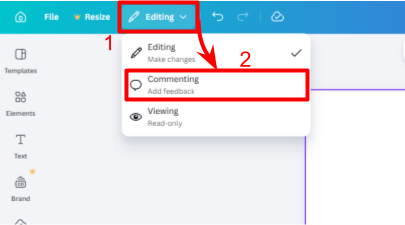
This will switch the screen to Commenting mode. All the tools you used in the Editing mode will disappear and you will only be able to make comments. - Click anywhere on the document, and a text box will appear in the top right corner of the page.
- You can also select the blue and purple pen icon
 in the top right of the page and then add a comment.
- You can also select the blue and purple pen icon
- Add your comment and then click the purple arrow button to save it.
Downloading and Sharing
When downloading a Canva project as a PDF, accessibility features may not be fully preserved. Elements such as reading order, headings, alt text, and table structure may not transfer correctly. After downloading, review the PDF and remediate any accessibility issues as needed. For guidance, visit the PDF Accessibility page.
When possible, sharing a Canva project within Canva can help preserve structure and improve accessibility. To share a Canva project:
- Click the share button in the top right corner of the page.
- Under the Access level drop-down menu, select Anyone with the link.
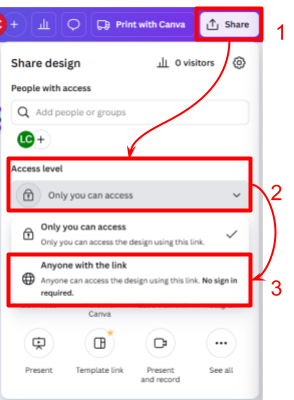
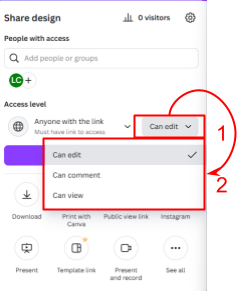
- Once selected, you can limit the amount of access the person you share the document with has. Choose one of the following permission levels:
- Can Edit: Allows others to edit the design.
- Can Comment: Allows others to leave comments only.
- Can View: Allows others to view the design without making changes.
Additional Resources
Canva Resources
- Canva PDF Accessibility Features
- Canva Accessibility Features
- Canva Use Design Accessibility
- Canva Edit Text Semantics for PDF Accessibility