Meeting Controls—Understanding Meeting Basics
Zoom - Get Started
The following list of pages will guide you through getting started with this tool. The current page is listed in bold.
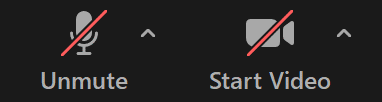
Cameras, Microphones, and Speakers
When joining a meeting, you will be prompted to Join with Computer Audio or select a different audio source. Using the computer audio is recommended.
From within the call, change your mic and camera sources by selecting the arrows next to the mic and video icons. There are also options to test your speaker and microphone within those menus.
From the mic menu, you can choose to join with phone audio instead or open the audio settings for more troubleshooting options.
Attendee Privileges / Access
Listed here are the four roles available for Zoom attendees:
- Host: Has control over everything in the meeting.
- Alternative Host: Has control over everything in the meeting (including the ability to start the call). This role needs to be assigned when scheduling an event.
- Co-Host: Has access to everything except starting or ending the meeting, making other participants co-hosts, or sharing a voice message when in breakout rooms.
- Participant: Only has the access that the host gives to them (mics, sharing content, chatting, etc.).
Participants Sidebar
When in a meeting, the Participants button (found at the bottom of the call screen) will open a sidebar that lists all of the people in the call. Below is a list of all of the features available within this sidebar.
- Invite: Directly invite someone into the call. There is also a “Copy Invite Link” button at the bottom to use if sending an invitation to multiple people.
- Mute All: Automatically mute all participants.
- Additional Options: Other options from the "..." menu include: controlling participants' mics, allowing participants to rename themselves, playing a sound when someone joins/leaves the meeting, enabling the waiting room, and locking the meeting. More information on each option is listed below.
Meeting Controls
- Mute Participants upon Entry: All participants joining the call will be muted when they enter the meeting. In Hybrid and Web Broadcast courses, it is recommended to use this feature to reduce audio feedback. In Connect classes, selecting this option may cause audio issues between classrooms and participants on Zoom.
- Allow Participants to Unmute Themselves: Control the access your participants have to their mics. This is helpful if handling a large number of people in a call.
- Allow Participants to Rename Themselves: Participants can change their display name.
- Play sound when someone joins or leaves: It is recommended to have this setting turned off as the sounds can get distracting.
- Enable Waiting Room: Everyone joining the call will be put into a waiting room until the host allows them access into the meeting. In Connect courses, selecting this option may cause problems with classrooms joining the Zoom call.
- Lock Meeting: When locked, no one else can join (even if they have the invitation). Unlock the meeting from the same location in the menu.
When hovering over the name of a participant, these are the options that are available:
- Mute/Unmute: When a participant is muted, you can “Ask to Unmute.” If they are unmuted, the host can directly mute them.
- Chat: Start a private chat with that participant.
- Start/Stop Video: You can Ask to Start Video or directly Stop Video.
- Make Host: Give someone access to control the meeting.
- Make Co-Host: Give someone access to everything except ending the meeting, making other participants co-hosts, and starting or managing breakout rooms. If you need someone to start the meeting for you or have access to these options, they need to be listed as alternative hosts when the meeting is scheduled.
- Put in Waiting Room: Remove that participant from the meeting and place them in a waiting room. They will be listed at the top of the participants sidebar where you can then admit them back into the call when ready.
- Remove: Dispel a participant from the call.
Chats
In the toolbar at the bottom of the call, there is an option to open the Chat feature.
Once open, choose who you would like to message. The chat defaults to everyone. If you would like to send an individual message, select the dropdown menu (probably labeled as Everyone at the beginning) and choose the participant you would like to chat with.
You can also share a file within the chat by selecting the file icon on the right.
To limit access for participants, you can choose who attendees can chat with by selecting the “…” options menu on the right.
Reactions / Raising Hands
Participants can raise their hand from the participants tab. When that happens, the host will see a blue hand icon appear next to their name or a yellow hand icon in the upper-left corner of the participant's video box.
![]()
The host can then unmute them and/or lower their hand by hovering over their name.
All attendees can also display reactions like a thumbs up or applause. These options are found in the “Reactions” button on the bottom of the window. The icons will appear in the corner of that participant’s video box.
Layouts
The two main layouts available in Zoom are Speaker View and Gallery View. For more examples and details, check out the Zoom support page Opens External Page . To switch between views, click on the View button and select an option from the dropdown menu.
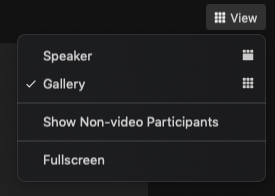
When in Gallery View, you can rearrange the attendees by dragging and dropping their video tiles. Gallery View layouts can be saved so the attendees appear in the same order on the screen in recurring meetings. To do this, first enable Save Gallery View in your account settings on zoom.usu.edu. Once that's done, the dropdown layout menu in the Zoom call (pictured above) will have an additional option of Save Video Order. The custom view will then be saved and available for other meetings in the series.
Speaker View

Speaker view displays the person that is talking larger than the rest.
Gallery View

Gallery view keeps everyone the same size. (You can click and drag on a video window to pin it to a specific portion of the screen.)
Pinning & Spotlighting
Pinning and spotlighting allows people in the call to view certain participants larger than the rest, independent of who is speaking. This is especially helpful for panels, forums, guest speaker situations, and interpreters.
- Pinning only highlights participants for the pinner. Hosts and co-hosts can pin up to 9 participants while non-hosts can pin 1 participant.
- Spotlighting highlights those participants for everyone. Hosts and co-hosts can spotlight up to 9 participants. Non-hosts cannot spotlight participants. This is a good option when there is a student that is leading a discussion.
To pin or spotlight, hover over a participant’s video square and select the three dots in the top right corner.
Note: spotlighting is only available if there are three or more participants in the Zoom call.
