man with tie icon wifi icon Scheduling a Meeting in Zoom

Scheduling your meeting through Canvas will automatically invite all of the students enrolled in that course. You will not need to list each participant individually.

Note: Zoom meetings are only added to IVC classes if the instructor has prior approval from their department and scheduling. Zoom should only be used to record unless they receive special permission to allow students to join remotely.
1

Go to your Canvas course and select the Zoom side tab

If the tab is not there, refer to the Integrate Zoom into Canvas page.

zoom highlighted in Canvas side navigation

 
2

Select the blue Schedule a New Meeting button in the top right

 
3

Fill out the required fields and click Save

We recommend you not use your Personal Meeting ID (PMI). If you decide to use your PMI, be sure to enable the waiting room feature so that you have to admit people to the meeting. This will help prevent Zoom bombings.

At the bottom of this page is an explanation of some of the options provided when scheduling a meeting. Once saved, the students will be able to see and join the meeting from the Zoom tab in Canvas.


Schedule Through the Website

Use the website to schedule Zoom meetings outside of normal class periods. Scheduling through the website is best for any meetings that are not classes linked to Canvas.

1

Go to zoom.usu.edu

 
2

Sign in with your A number and password when prompted

 
3

Click on Meetings on the left

 
4

Select Schedule a Meeting in the top right

 
5

Fill out the required fields and click Save (at the bottom of this page is an explanation of some of the options provided when scheduling a meeting)


Schedule through the Application

It is recommended to schedule your meeting through Canvas or through the web browser. However, if those options are not available, open the Zoom application and click Schedule. Fill out the required fields and click Save. At the bottom of this page is an explanation of some of the options provided when scheduling a meeting.

Duration

The meeting time length. Note that the meeting will not automatically disconnect at the end of the duration time. This option is mostly to inform attendees in the invitation how long the meeting is expected to run.

Registration
Your participants will need to register with their name and email address in order to get access to the meeting link. You can also add custom questions for registrants to answer. You need to select this option to get a report of who was in the meeting.

Recurring meeting
Select this if you want the meeting to be repeated daily, weekly, monthly, or a custom number of times. Select the date when you want these recurrences to end or the number of instances you would like to be scheduled.
Audio
You can choose if the participants’ and hosts’ mics are automatically turned on when they join the meeting. Regardless of what you choose, participants will still have control over their mics.


Video
You can choose if the participants’ and hosts’ videos are automatically turned on when they join the meeting. Regardless of what you choose, participants will still have control over their videos.

Import a Previously Scheduled Zoom Meeting into Canvas

If you have previously scheduled a series of meetings in Zoom and want to make them available to students in your class in Canvas, follow these steps:

1

Find the meeting ID for the Zoom call

  1. Log into the https://usu-edu.zoom.us website
  2. Click on the Meetings tab on the left-hand menu
  3. Click on the title of the meeting you want to import into your class
  4. Copy the Meeting ID
Copy the Zoom meeting ID


2

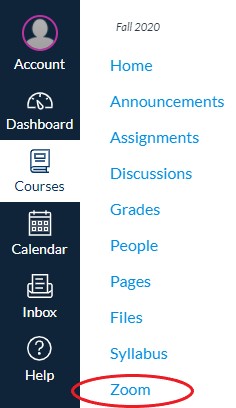
Go to your Canvas course and click on the Zoom link in the course navigation

Zoom in the Canvas course navigation.

 
3

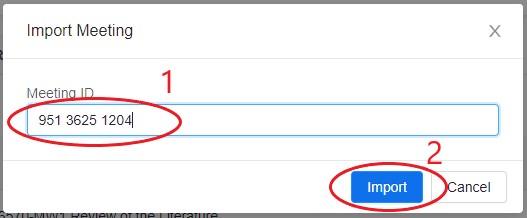
Next to the Schedule a New Meeting button, click on the button with three dots and choose Import meeting from the drop-down menu.

Import Meeting option in Canvas.

 
4

Where prompted, enter the Meeting ID. Then, click on the Import button.

Import Zoom meeting in Canvas.


Meeting Options

Use personal meeting ID
This option is not recommended. If checked, the participants will meet in your Personal Meeting Room instead of a different call space. Since it is always accessed through the same Meeting ID and personal link, this option should not be used for back-to-back meetings. Once someone has the link, they can join your personal room any time there is a meeting in use (unless the meeting is locked or you have the Waiting Room enabled).
Alternative hosts
List participants’ email addresses that you want to have host access. This is most commonly used if you would like someone else to be able to start a meeting instead of yourself. Once an alternate host is added, they will receive an email notifying them about their new role and providing the Zoom link. The user will need to be signed into their USU Zoom account within the desktop application (not zoom.usu.edu) in order for the meeting to recognize them as the alternate host.
Require meeting password
This is automatically enabled for USU. Either leave the default password in the box or customize it.

Enable join before host
If checked, participants can join the call before the host does. If not checked, everyone will be in a waiting room until the host joins. (Automatic recordings will begin when the first person enters the meeting.)
Mute participants upon entry
It is recommended to have this checked. All participants will join with their mics muted. This reduces the initial audio feedback when starting a meeting.

Enable waiting room
Any participant that joins will be put into a waiting room. The host will get a notification that people are waiting to be let into the call and can then allow or deny their access to join the meeting.
Breakout Room pre-assign
Build your breakout rooms and decide which participants are in which group before the call actually starts. 

Only authenticated users can join
Restrict which participants can join a meeting to those who are logged into Zoom or are using a certain domain. If checked, students will have to log into Zoom before joining the class.
Record the meeting automatically
As long as there is enough space on your computer or on the cloud, the meeting will be recorded automatically.
Note that users need to be within the USU Zoom account in order to be added as an alternate host. If you know a user is a full-time student or benefited employee but Zoom will not allow you to add them, make sure that user has activated their account by signing into https://zoom.usu.edu with their A number and strong password.

Guest Speakers

Invite guest speakers by selecting the title of the meeting in the Upcoming Meetings tab (either within the Zoom page in your course or within the Meetings side tab on the left of zoom.usu.edu). When viewing the meeting information, there is an Invite Attendees option listed that contains the link to join the call. You can then Copy the invitation and send it to the guest speaker.

Invite Attendees in Zoom

To invite guest speakers once in the call, open the Participants tab and click Invite (found at the bottom of the participants sidebar). You can then Copy Invite Link or send an email with the invitation to individuals.


Schedule on Behalf of Someone in Zoom

If you would like someone to schedule the meetings for you, there is an option to give a person access to schedule on behalf of the host. This is beneficial for instructors with TAs or assistants around campus. To grant someone access to schedule meetings for you, follow these steps:

1

Go to https://zoom.usu.edu and sign in

 
2

Open the Settings tab on the left.

 
3

Scroll to the very bottom of the page to find Schedule Privilege.

 
4

Where it says assign schedule privilege to, click on the + and type in the person’s email.

Giving someone access to schedule meetings for you also gives them the ability to edit meeting details. If you would like to learn more, check out the Zoom Scheduling Privilege support page.

Zoom - Get Started

The following list of pages will guide you through getting started with this tool. The current page is listed in bold.